Mt Yotei · Routes
↘ Hirafu Route
This route carries serious backcountry hazards. Its slope and ATES labels are planning estimates; they do not decide whether it is safe today or suitable for your group.
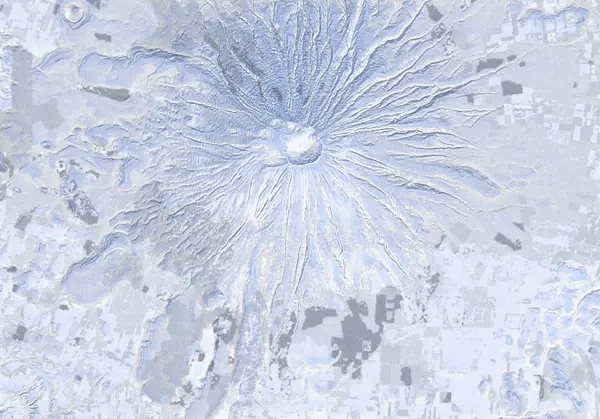 出典:国土地理院(標高タイル DEM10B を加工して作成)
Steepness · profile
← Distance 11.7 km →
Per-segment terrain (data table)
| % | m | Steepness | Aspect |
|---|---|---|---|
| 0% | 294 | 19° | W |
| 3% | 302 | 19° | NW |
| 6% | 354 | 25° | W |
| 10% | 379 | 18° | W |
| 13% | 407 | 10° | W |
| 16% | 445 | 16° | W |
| 19% | 499 | 20° | W |
| 23% | 577 | 30° | NW |
| 26% | 710 | 35° | W |
| 29% | 844 | 34° | W |
| 32% | 1039 | 37° | NW |
| 35% | 1278 | 40° | NW |
| 39% | 1456 | 40° | NW |
| 42% | 1623 | 40° | NW |
| 45% | 1676 | 34° | S |
| 48% | 1778 | 37° | SW |
| 52% | 1712 | 39° | SE |
| 55% | 1816 | 43° | E |
| 58% | 1688 | 25° | SW |
| 61% | 1658 | 40° | SW |
| 65% | 1514 | 40° | NW |
| 68% | 1335 | 41° | NW |
| 71% | 1086 | 34° | NW |
| 74% | 873 | 38° | W |
| 77% | 729 | 31° | W |
| 81% | 587 | 20° | NW |
| 84% | 505 | 16° | NW |
| 87% | 450 | 11° | W |
| 90% | 408 | 16° | NW |
| 94% | 378 | 19° | W |
| 97% | 355 | 19° | W |
| 100% | 301 | 19° | W |
Route guide
Mt Yotei's Hirafu route climbs the mountain's west-to-northwest flank (mean aspect ~280 degrees) for about 1,550 m of vertical over roughly 12 km one way. It begins at the Hirafu trailhead parking on the west side (~290 m). The lower section follows forestry road and forest, passing the end of the forestry road (~560 m), the Minamikobu junction (~590 m) and the Southern Knob (Minami-kobu, 649 m) as it gains height gradually.
Around 700 m the angle steepens (the "700 m point – steep climb"). The gully terrain here funnels avalanches, and a waypoint explicitly warns against entering one drainage ("Do not enter this gully," ~708 m). The route continues over a 970 m narrow spur, past 1,000 m, and onto a flatter bench known as "The Terrace" (~1,050 m). To here the travel is mostly through treeline forest.
Roughly 1,300–1,350 m is where most skiers turn around ("1300 m / 1350 m – Most descend from here"). Above this the snow hardens: a waypoint marks the "Powder line – often icy beyond here." The trees thin and wind effect grows. A distinct avalanche-danger point sits near 1,475 m.
On the upper cone (~1,600–1,700 m) the slope locally reaches around 40 degrees and the surface is commonly wind-affected or icy. Several waypoints flag that crampons and/or ski crampons are often required through this band (~1,603 m, 1,631 m, 1,650 m, 1,694 m). The Yotei emergency hut stands at about 1,673–1,682 m, and the crater rim is reached near 1,703 m. The high point is the Yotei summit marker on the rim (1,898 m); Makkari-dake (1,892 m) is another point on the rim. The rim is exposed and windy, and orientation is easily lost in poor visibility.
The single greatest hazard on the descent is aspect. Yotei is an isolated cone, and the upper mountain presents similar-looking slopes in every direction. In flat light (overcast or cloud that erases all shadow and texture) it is easy to drop off onto an aspect other than the west-to-northwest face you ascended — a mistake made on this peak every season. Carry reliable navigation and descend the aspect you planned. This route is classified ATES "complex" (Level 3): it is unambiguous avalanche terrain and demands a current stability assessment and your own judgement.
Access & logistics
Trailhead & parking: The route starts at the Hirafu trailhead parking on the west side (~290 m). Access is typically from the Niseko/Kutchan area; in winter the usable parking depends on plowing, so check current local conditions before committing to a plan.
Getting there: Approach the northwest base of Yotei from the Kutchan/Niseko side. Expect snow and ice on the roads — a 4WD vehicle with winter tyres or equivalent is appropriate. Public transport is limited and infrequent, so confirm options in advance.
Descent point: Most skiers begin their descent from about 1,300–1,350 m (the "Most descend from here" marks). Above that it becomes a hard, icy, wind-exposed zone; pushing to the crater rim or summit depends entirely on the day's conditions and your judgement.
After: Onsen and food are scattered around the Kutchan/Niseko area. Hours and openings vary by season, so confirm locally.
Yotei — local notes
- The summit dome is featureless — in a whiteout, navigate by compass bearing.
- The crater rim can be corniced — keep well back from the edge.
- Above ~1300 m the snow is often wind-hammered or icy — crampons or ski-crampons are commonly needed, and many parties descend from here.
- Near the summit the slope faces every aspect — wind-loading and sun change fast; read the bulletin’s full rose.
- On a symmetric cone with a featureless summit it’s easy to drop the wrong aspect in flat light and descend into a different valley than you climbed — confirm your descent bearing before dropping in.
Today / tomorrow briefing
Loading…
Set reminders inside Google Calendar
Hokkaido Wilds · Rob Thomson — HokkaidoWilds.org · CC BY-SA 4.0
A planning aid, not a verdict. Always check the day’s official avalanche bulletin and decide in the field.
山のまこちゃん · Video report
山のまこちゃん (Yama no Makochan) covers Yotei routes on video — embedding pending his permission.
Route data source: Rob Thomson — HokkaidoWilds.org · CC BY-SA 4.0 · ↓ Download GPX