Mt Yotei · Routes
↘ Makkimo Route
This route carries serious backcountry hazards. Its slope and ATES labels are planning estimates; they do not decide whether it is safe today or suitable for your group.
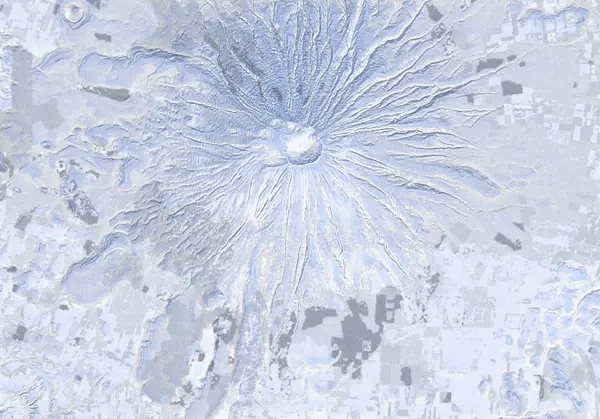 出典:国土地理院(標高タイル DEM10B を加工して作成)
Steepness · profile
← Distance 10.2 km →
Per-segment terrain (data table)
| % | m | Steepness | Aspect |
|---|---|---|---|
| 0% | 320 | 3° | N |
| 3% | 331 | 4° | S |
| 6% | 349 | 6° | S |
| 10% | 371 | 8° | S |
| 13% | 401 | 11° | SE |
| 16% | 438 | 12° | S |
| 19% | 479 | 21° | SE |
| 23% | 534 | 46° | SE |
| 26% | 618 | 53° | SE |
| 29% | 713 | 59° | E |
| 32% | 840 | 34° | SE |
| 35% | 1003 | 36° | SE |
| 39% | 1163 | 40° | SE |
| 42% | 1342 | 40° | SE |
| 45% | 1539 | 41° | E |
| 48% | 1745 | 40° | SE |
| 52% | 1833 | 42° | SE |
| 55% | 1633 | 40° | SE |
| 58% | 1428 | 40° | SE |
| 61% | 1240 | 34° | SE |
| 65% | 1085 | 35° | S |
| 68% | 934 | 36° | SE |
| 71% | 788 | 56° | SE |
| 74% | 676 | 43° | SE |
| 77% | 592 | 32° | E |
| 81% | 517 | 17° | S |
| 84% | 470 | 12° | SE |
| 87% | 432 | 10° | S |
| 90% | 394 | 7° | S |
| 94% | 366 | 6° | SE |
| 97% | 348 | 4° | S |
| 100% | 331 | 3° | S |
Route guide
[Makkimo Route / Mt Yotei] South-east flank. ~1,566 m of vertical, with an upper cone reaching about 57° at its steepest. Treat the whole line as avalanche terrain.
[~319 m — parking / start] Start from the large parking area. The lower mountain is gentle larch and birch forest; gain height by following the terrain. The grade is easy here but the climb to the summit is continuous from this point on.
[~700–900 m — upper forest] You pass the "Crampons may be required" point in this band. Wind-scoured and firm surfaces appear and skins can lose purchase. Above the "Powder line (often icy beyond here)" waypoint the snow tends to harden noticeably — carry crampons/ski crampons as a matter of course.
[~1,000–1,400 m — treeline to mid-flank] Above the trees you reach exposed, wind-affected slopes where visibility, wind and snow quality change sharply. Being a SE–E aspect, it takes both sun and wind, so wind slab, breakable crust and ice are commonly mixed. The angle steepens and a fall itself becomes a serious hazard.
[~1,650–1,867 m — upper cone / most descend from here] Toward the crater rim the slope stands up further; the track tops out near 1,867 m. Many parties do not push for the true high point and begin their descent from around here (roughly 1,850 m). As the ~57° max slope figure implies, the upper cone is steep, firm and persistently windy.
[summit / crater — ~1,885 m] The true summit and crater rim lie just above. Only if conditions and visibility allow. Watch for cornices, wind-loading and cracks around the rim.
[Descent — critical caution] Yotei is a clean, isolated cone and the upper flank is a featureless, uniform slope. In flat light (cloud or fog) it is easy to drop onto a different aspect than the SE flank you climbed. The various route bases are widely separated at the foot of the mountain, so descending the wrong aspect can mean a long re-ascent or worse. Always confirm your descent bearing with compass/GPS, and do not ski blind in poor visibility. This is avalanche terrain — judgement is your own responsibility.
Access & logistics
[Trailhead / parking] The Makkimo route climbs the south-east side of Mt Yotei, approached from the Kyogoku side. It starts at a large parking area at about 319 m.
[Getting there] South-east foot of Mt Yotei in the Shiribeshi region. Access is normally by road from the Kyogoku / Kimobetsu direction. In winter, snow-clearing and ice may prevent driving all the way to the parking area, so always check current road and plowing conditions. Public transport is limited; a private vehicle is the practical option.
[Descent point] Many parties do not tag the true high point and begin their descent from roughly 1,850 m (the track tops out near 1,867 m).
[After] The towns around the foot of Yotei (Kyogoku, Kimobetsu, Kutchan, Niseko area) have scattered onsen and eateries; Kyogoku is also known for its spring water. Check opening hours and winter closures yourself.
Yotei — local notes
- The summit dome is featureless — in a whiteout, navigate by compass bearing.
- The crater rim can be corniced — keep well back from the edge.
- Above ~1300 m the snow is often wind-hammered or icy — crampons or ski-crampons are commonly needed, and many parties descend from here.
- Near the summit the slope faces every aspect — wind-loading and sun change fast; read the bulletin’s full rose.
- On a symmetric cone with a featureless summit it’s easy to drop the wrong aspect in flat light and descend into a different valley than you climbed — confirm your descent bearing before dropping in.
Today / tomorrow briefing
Loading…
Set reminders inside Google Calendar
Hokkaido Wilds · Rob Thomson — HokkaidoWilds.org · CC BY-SA 4.0
A planning aid, not a verdict. Always check the day’s official avalanche bulletin and decide in the field.
山のまこちゃん · Video report
山のまこちゃん (Yama no Makochan) covers Yotei routes on video — embedding pending his permission.
Route data source: Rob Thomson — HokkaidoWilds.org · CC BY-SA 4.0 · ↓ Download GPX